Techsith Easy Way to Udnerstand React Lifecycle
Editor's note: The introduction of React Hooks in React 16.8 has rendered some of the methods described in this tutorial out of date. For more insight into how React state and lifecycle features are handled in 2021, check out our React Hooks reference guide and cheat sheet.
What are React lifecycle methods? To put it in simple terms, you can think of the React component lifecycle as the "lifetime" of a component. Lifecycle methods are series of events that happen throughout the birth, growth, and death of a React component.
This comprehensive guide aims to help you intuitively understand what React lifecycle methods are and why they are useful. Here's what we'll cover:
- What is the React component lifecycle?
- What are React lifecycle methods?
- Mounting lifecycle methods
-
constructor() -
static getDerivedStateFromProps() -
render() -
componentDidMount()
-
- Updating lifecycle methods
-
static getDerivedStateFromProps() -
shouldComponentUpdate() -
render() -
getSnapshotBeforeUpdate() -
componentDidUpdate()
-
- Unmounting lifecycle method
-
componentWillUnmount
-
- Error handling lifecycle methods
-
static getDerivedStateFromError() -
componentDidCatch()
-
For a visual overview of what we'll cover in this tutorial, the following diagram illustrates how the React component lifecycle works:

What is the React component lifecycle?
In React, components go through a lifecycle of events:
- Mounting (adding nodes to the DOM)
- Updating (altering existing nodes in the DOM)
- Unmounting (removing nodes from the DOM)
- Error handling (verifying that your code works and is bug-free)
You can think of these events as a component's birth, growth, and death, respectively. Error handling is like an annual physical.
Let's look at a simple example. If I told you to build a Hello World component, you might write something like this:
class HelloWorld extends React.Component { render() { return <h1> Hello World </h1> } } When this component is rendered and viewed on a client, you may end up with a view like this:

Before rendering, the component will have gone through its mounting, updating, and unmounting phase. Let's break it down further.
Mounting a component is like bringing a newborn baby into the world. This is the component's first glimpse of life. At this phase, the component, which consists of your code and React's internals, is then inserted into the DOM.
After the mounting phase, the React component "grows" during the updating phase. Without updates, the component would remain as it was when it was initially created in the DOM. As you might imagine, many of the components you write till need to be updated , whether via a change in state or props. Consequently, they go through the updating phase as well.
The final phase is called the unmounting phase. At this stage, the component "dies". In React lingo, it is removed from the DOM.
There's one more phase a React component can go through: the error handling phase. This occurs when your code doesn't run or there's a bug somewhere. Think of it like an annual physical.
The following diagram shows the React lifecycle:
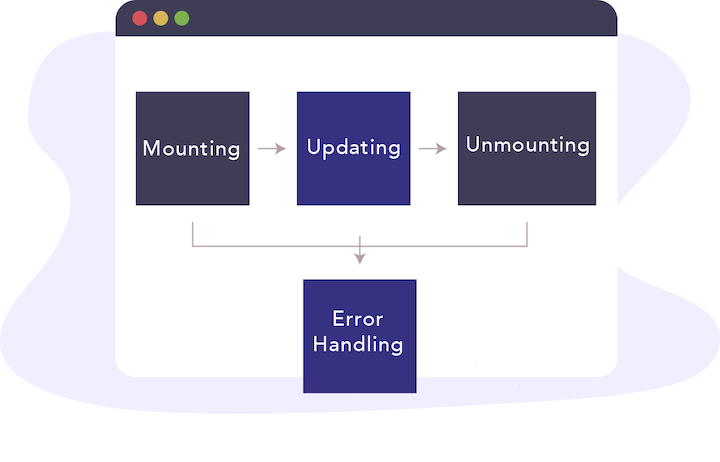
Note that a React component may not go through every phase. For example, a component could be mounted one minute and then unmounted the next without any updates or error handling. The illustration and example described above assume that the component goes through all four phases .

What are React lifecycle methods?
Each React lifecycle phase has a number of lifecycle methods that you can override to run code at specified times during the process. These are popularly known as component lifecycle methods.
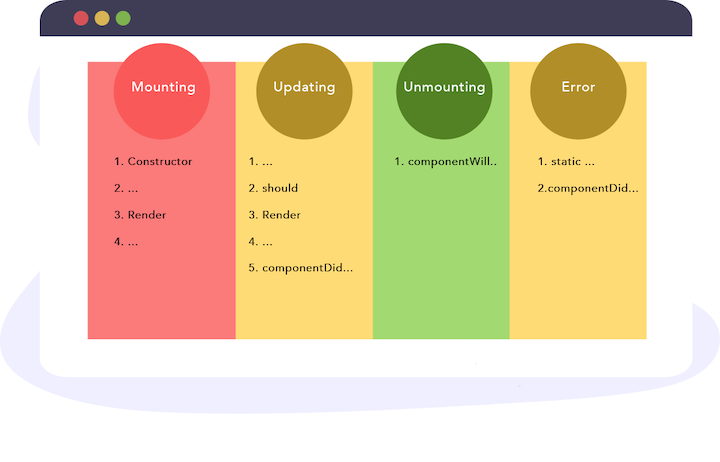
The diagram below shows the React lifecycle methods associated with the mounting, updating, umounting, and error lifecycle phases:
Mounting lifecycle methods
The mounting phase refers to the phase during which a component is created and inserted to the DOM.
The following methods are called in order.
1. constructor()
The constructor() is the very first method called as the component is "brought to life."
The constructor method is called before the component is mounted to the DOM. In most cases, you would initialize state and bind event handlers methods within the constructor method.
Here's a quick example of the constructor() React lifecycle method in action:
const MyComponent extends React.Component { constructor(props) { super(props) this.state = { points: 0 } this.handlePoints = this.handlePoints.bind(this) } } It's worth reiterating that this is the first method invoked before the component is mounted to the DOM. The constructor is not where you would introduce any side effects or subscriptions, such as event handlers.
2. static getDerivedStateFromProps()
static getDerivedStateFromProps is a new React lifecycle method as of React 17 designed to replace componentWillReceiveProps.
Its main function is to ensure that the state and props are in sync for when it's required.
The basic structure of the static getDerivedStateFromProps() looks like this:
const MyComponent extends React.Component { ... static getDerivedStateFromProps() { //do stuff here } } static getDerivedStateFromProps() takes in props and state:
... static getDerivedStateFromProps(props, state) { //do stuff here } ... You can return an object to update the state of the component:
... static getDerivedStateFromProps(props, state) { return { points: 200 // update state with this } } ... Or you can return null to make no updates:
... static getDerivedStateFromProps(props, state) { return null } ... Why exactly is this lifecycle method important? While static getDerivedStateFromProps() is a rarely used lifecycle method, it comes in handy in certain scenarios.
Remember, this method is called (or invoked) before the component is rendered to the DOM on initial mount.
Here's a quick example so you can see the static getDerivedStateFromProps() method in action. Consider a simple component that renders the number of points scored by a football team. As you may expect, the number of points is stored in the component state object:
class App extends Component { state = { points: 10 } render() { return ( <div className="App"> <header className="App-header"> <img src={logo} className="App-logo" alt="logo" /> <p> You've scored {this.state.points} points. </p> </header> </div> ); } } The result is as follows:

The text reads, "you have scored 10 points" where 10 is the number of points in the state object.
Let's look at another example. If you put in the static getDerivedStateFromProps method as shown below, what number of points would be rendered?
class App extends Component { state = { points: 10 } // ******* // NB: Not the recommended way to use this method. Just an example. Unconditionally overriding state here is generally considered a bad idea // ******** static getDerivedStateFromProps(props, state) { return { points: 1000 } } render() { return ( <div className="App"> <header className="App-header"> <img src={logo} className="App-logo" alt="logo" /> <p> You've scored {this.state.points} points. </p> </header> </div> ); } } Right now, we have the static getDerivedStateFromProps component lifecycle method in there. If you remember from the previous explanation, this method is called before the component is mounted to the DOM. By returning an object, we update the state of the component before it is even rendered.
Here's what we get:

The 1000 comes from updating state within the static getDerivedStateFromProps method.
This example is contrived and not really representative of the way you'd use the static getDerivedStateFromProps method. But I think it's helpful for understanding the basics.
With this lifecycle method, just because you can update state doesn't mean you should. There are specific use cases for the static getDerivedStateFromProps method. If you use it in the wrong context, you'll be solving a problem with the wrong tool.
So when should you use the static getDerivedStateFromProps lifecycle method?
The method name getDerivedStateFromProps comprises five words: get derived state from props. Essentially, static getDerivedStateFromProps allows a component to update its internal state in response to a change in props.
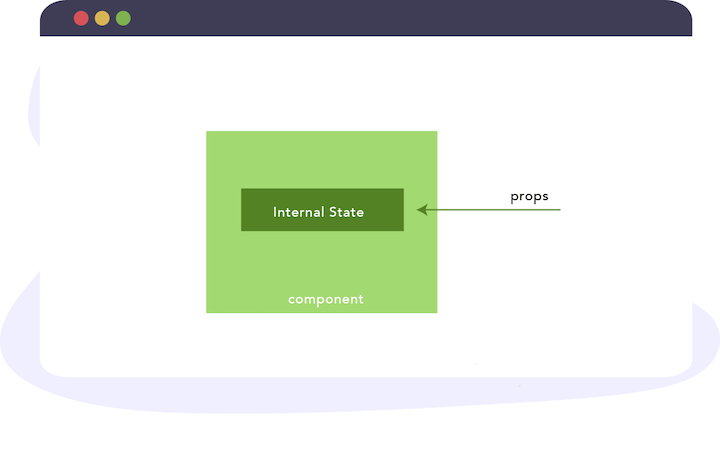
Component state in this manner is referred to as derived state.
As a rule of thumb, derived state should be used sparingly as you can introduce subtle bugs into your application if you aren't sure of what you're doing.
3. render()
After the static getDerivedStateFromProps method is called, the next lifecycle method in line is the render method:
class MyComponent extends React.Component { // render is the only required method for a class component render() { return <h1> Hurray! </h1> } } If you want to render elements to the DOM, — e.g., returning some JSX — the render method is where you would write this (as shown above).
You could also return plain strings and numbers, as shown below:
class MyComponent extends React.Component { render() { return "Hurray" } } Or, you could return arrays and fragments:
class MyComponent extends React.Component { render() { return [ <div key="1">Hello</div>, <div key="2" >World</div> ]; } } class MyComponent extends React.Component { render() { return <React.Fragment> <div>Hello</div> <div>World</div> </React.Fragment> } } If you don't want to render anything, you could return a boolean or null within the render method:
class MyComponent extends React.Component { render() { return null } } class MyComponent extends React.Component { // guess what's returned here? render() { return (2 + 2 === 5) && <div>Hello World</div>; } } Lastly, you could return a portal from the render method:
class MyComponent extends React.Component { render() { return createPortal(this.props.children, document.querySelector("body")); } } An important thing to note about the render method is that the render function should be pure i.e do not attempt to usesetStateor interact with the external APIs.
4. componentDidMount()
Afterrender is called, the component is mounted to the DOM and the componentDidMount method is invoked.
This function is invoked immediately after the component is mounted to the DOM.
You would use the componentDidMount lifecycle method to grab a DOM node from the component tree immediately after it's mounted.
For example, let's say you have a modal and want to render the content of the modal within a specific DOM element:
class ModalContent extends React.Component { el = document.createElement("section"); componentDidMount() { document.querySelector("body).appendChild(this.el); } // using a portal, the content of the modal will be rendered in the DOM element attached to the DOM in the componentDidMount method. } If you also want to make network requests as soon as the component is mounted to the DOM, this is a perfect place to do so:
componentDidMount() { this.fetchListOfTweets() // where fetchListOfTweets initiates a netowrk request to fetch a certain list of tweets. } You could also set up subscriptions such as timers. Here's an example:
// e.g requestAnimationFrame componentDidMount() { window.requestAnimationFrame(this._updateCountdown); } // e.g event listeners componentDidMount() { el.addEventListener() } Just make sure to cancel the subscription when the component unmounts. I'll show you how to do this when we discuss thecomponentWillUnmount lifecycle method.
Updating lifecycle methods
Whenever a change is made to thestate orprops of a React component, the component is rerendered. In simple terms, the component is updated. This is the updating phase of the React component lifecycle.
So what lifecycle methods are invoked when the component is to be updated?
The static getDerivedStateFromProps is the first React lifecycle method to be invoked during the updating phase. I already explained this method in the mounting phase, so I'll skip it.
We already explained this method when reviewing the mounting lifecycle phase. What's important to note is that this method is invoked in both the mounting and updating phases.
2. shouldComponentUpdate()
Oncethe static getDerivedStateFromProps method is called, theshouldComponentUpdate method is called next.
In most cases, you'll want a component to rerender when state or props changes. However, you do have control over this behavior.
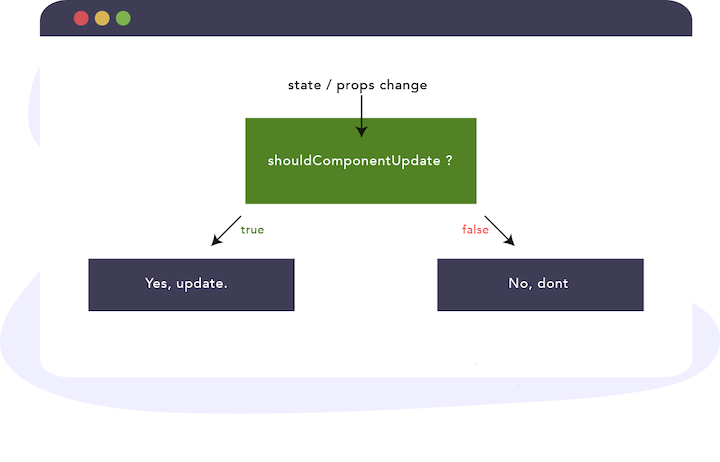
Within this lifecycle method, you can return a boolean —true orfalse — and control whether the component gets rerendered (e.g., upon a change in state or props).
This lifecycle method is mostly used for performance optimization measures. However, this is a very common use case, so you could use the built-in React.PureComponent when you don't want a component to rerender if the stateandprops don't change.
3. render()
After theshouldComponentUpdate method is called,render is called immediately afterward, depending on the returned value from shouldComponentUpdate, which defaults to true .
4. getSnapshotBeforeUpdate()
The getSnapshotBeforeUpdatelifecycle method stores the previous values of the state after the DOM is updated. getSnapshotBeforeUpdate() is called right after the render method.
Most likely, you'll rarely reach for this lifecycle method. But it comes in handy when you need to grab information from the DOM (and potentially change it) just after an update is made.
Here's the important thing: the value queried from the DOM in getSnapshotBeforeUpdate refers to the value just before the DOM is updated, even though the render method was previously called.
Think about how you use version control systems, such as Git. A basic example is that you write code and stage your changes before pushing to the repo.
Let's assume the render function was called to stage your changes before actually pushing to the DOM. Before the actual DOM update, information retrieved from getSnapshotBeforeUpdate refers to those before the actual visual DOM update.
Actual updates to the DOM may be asynchronous, but thegetSnapshotBeforeUpdate lifecycle method is always called immediately before the DOM is updated.
This is a tricky method, so let's look at another example.
A classic case where the getSnapshotBeforeUpdate lifecycle method comes in handy is in a chat application. I've gone ahead and added a chat pane to the previous example app:
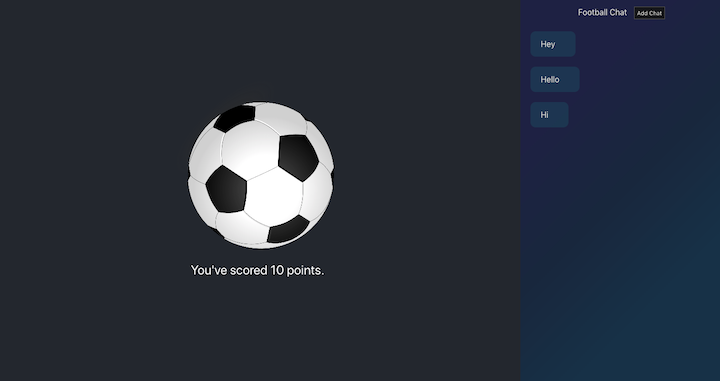
The implementation of the chat pane is as simple as it looks. Within the App component is an unordered list with aChats component:
<ul className="chat-thread"> <Chats chatList={this.state.chatList} /> </ul> TheChats component renders the list of chats, and for this, it needs achatList prop. This is basically an Array. In this case, an array of 3 string values,["Hey", "Hello", "Hi"].
TheChats component has a simple implementation as follows:
class Chats extends Component { render() { return ( <React.Fragment> {this.props.chatList.map((chat, i) => ( <li key={i} className="chat-bubble"> {chat} </li> ))} </React.Fragment> ); } } It just maps through thechatList prop and renders a list item which is in turn styled to look like a chat bubble :).
Within the chat pane header is an Add Chat button:
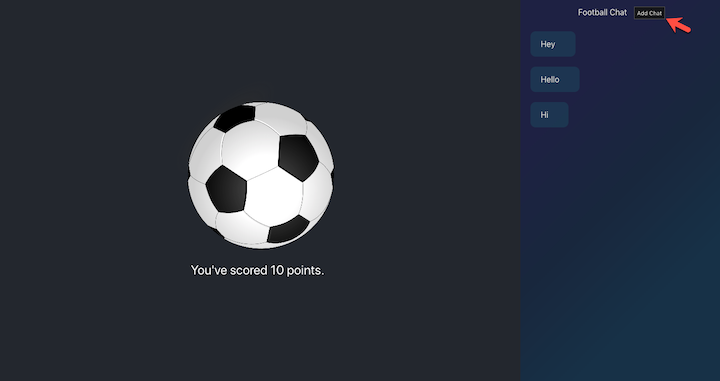
Clicking this button will add a new chat text, "Hello", to the list of rendered messages.
Here's that in action:
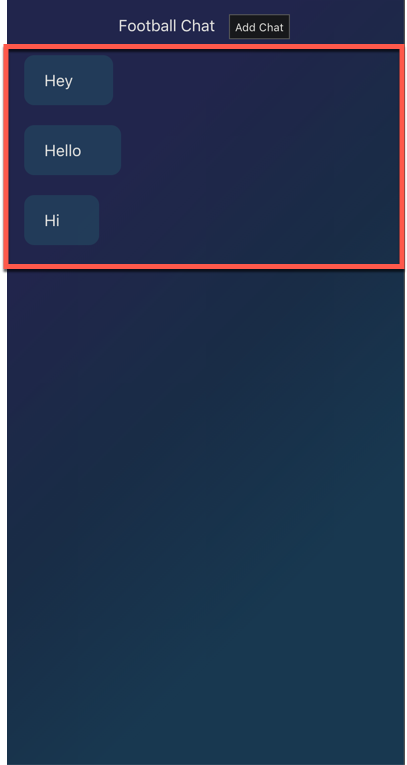
The problem here, as with most chat applications is that whenever the number of chat messages exceeds the available height of the chat window, the expected behavior is to auto-scroll down the chat pane so that the latest chat message is visible. That's not the case now:
Let's see how we may solve this using thegetSnapshotBeforeUpdate lifecycle method.
The way thegetSnapshotBeforeUpdate lifecycle method works is that when it is invoked, it gets passed the previous props and state as arguments.
So we can use theprevProps andprevState parameters as shown below:
getSnapshotBeforeUpdate(prevProps, prevState) { } Within this method, you're expected to either return a value ornull:
getSnapshotBeforeUpdate(prevProps, prevState) { return value || null // where 'value' is a valid JavaScript value } Whatever value is returned here is then passed on to another lifecycle method. You'll see what I mean soon.
ThegetSnapshotBeforeUpdate React lifecycle method doesn't work on its own. It is meant to be used in conjunction with the componentDidUpdate lifecycle method.
5. componentDidUpdate()
The componentDidUpdate lifecycle method is invoked after the getSnapshotBeforeUpdate. As with thegetSnapshotBeforeUpdate method it receives the previous props and state as arguments:
componentDidUpdate(prevProps, prevState) { } However, that's not all.
Whatever value is returned from thegetSnapshotBeforeUpdate lifecycle method is passed as the third argument to thecomponentDidUpdate method.
Let's call the returned value fromgetSnapshotBeforeUpdate, snapshot, and here's what we get thereafter:
componentDidUpdate(prevProps, prevState, snapshot) { } With this knowledge, let's solve the chat auto scroll position problem.
To solve this, I'll need to remind (or teach) you some DOM geometry. So bear with me.
In the meantime, here's all the code required to maintain the scroll position within the chat pane:
getSnapshotBeforeUpdate(prevProps, prevState) { if (this.state.chatList > prevState.chatList) { const chatThreadRef = this.chatThreadRef.current; return chatThreadRef.scrollHeight - chatThreadRef.scrollTop; } return null; } componentDidUpdate(prevProps, prevState, snapshot) { if (snapshot !== null) { const chatThreadRef = this.chatThreadRef.current; chatThreadRef.scrollTop = chatThreadRef.scrollHeight - snapshot; } } Here's the chat window:

However, the graphic below highlights the actual region that holds the chat messages (the unordered list,ul which houses the messages):
It is thisul we hold a reference to using a React Ref.
<ul className="chat-thread" ref={this.chatThreadRef}> ... </ul> First off, becausegetSnapshotBeforeUpdate may be triggered for updates via any number of props or even a state update, we wrap to code in a conditional that checks if there's indeed a new chat message:
getSnapshotBeforeUpdate(prevProps, prevState) { if (this.state.chatList > prevState.chatList) { // write logic here } } ThegetSnapshotBeforeUpdate has to return a value. If no chat message was added, we will just returnnull:
getSnapshotBeforeUpdate(prevProps, prevState) { if (this.state.chatList > prevState.chatList) { // write logic here } return null } Now consider the full code for thegetSnapshotBeforeUpdate method:
getSnapshotBeforeUpdate(prevProps, prevState) { if (this.state.chatList > prevState.chatList) { const chatThreadRef = this.chatThreadRef.current; return chatThreadRef.scrollHeight - chatThreadRef.scrollTop; } return null; } First, consider a situation where the entire height of all chat messages doesn't exceed the height of the chat pane:
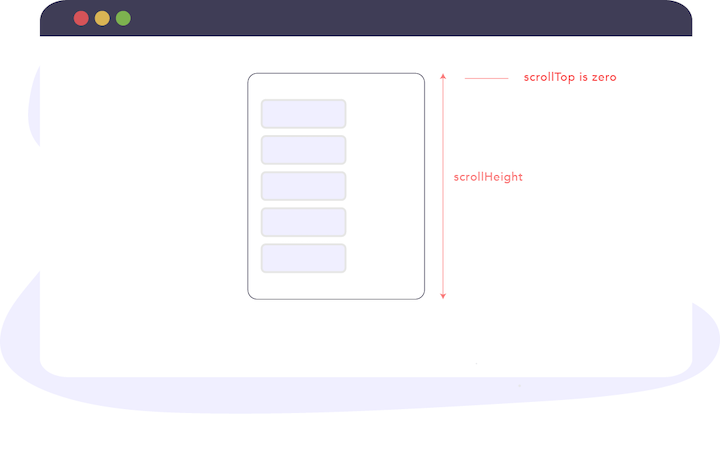
Here, the expressionchatThreadRef.scrollHeight - chatThreadRef.scrollTopwill be equivalent tochatThreadRef.scrollHeight - 0.
When this is evaluated, it'll be equal to thescrollHeight of the chat pane — just before the new message is inserted to the DOM.
If you remember from the previous explanation, the value returned from thegetSnapshotBeforeUpdate method is passed as the third argument to thecomponentDidUpdate method. We call thissnapshot:
componentDidUpdate(prevProps, prevState, snapshot) { } The value passed in here — at this time, is the previousscrollHeight before the update to the DOM.
In thecomponentDidUpdate we have the following code, but what does it do?
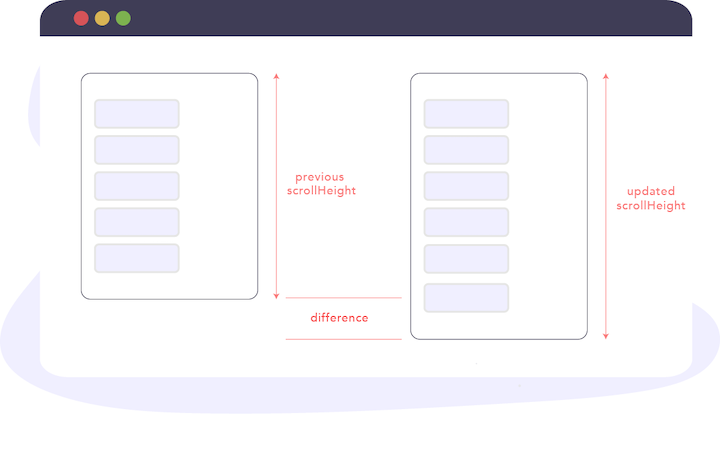
componentDidUpdate(prevProps, prevState, snapshot) { if (snapshot !== null) { const chatThreadRef = this.chatThreadRef.current; chatThreadRef.scrollTop = chatThreadRef.scrollHeight - snapshot; } } In actuality, we are programmatically scrolling the pane vertically from the top down, by a distance equal tochatThreadRef.scrollHeight - snapshot;.
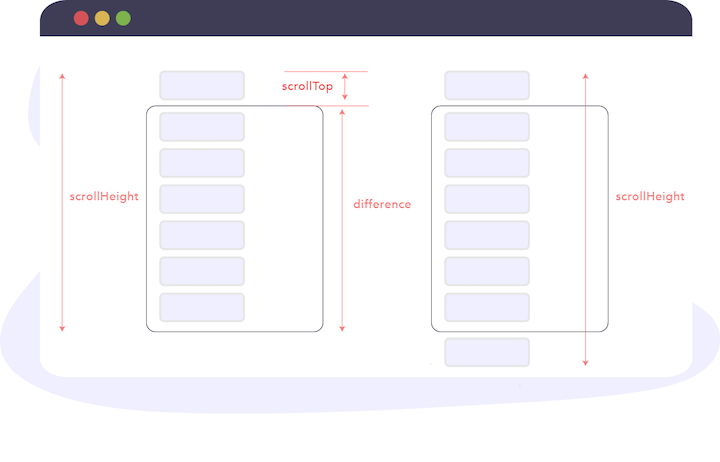
Sincesnapshot refers to thescrollHeight before the update, the above expression returns the height of the new chat message plus any other related height owing to the update. Please see the graphic below:
When the entire chat pane height is occupied with messages (and already scrolled up a bit), thesnapshot value returned by thegetSnapshotBeforeUpdate method will be equal to the actual height of the chat pane:
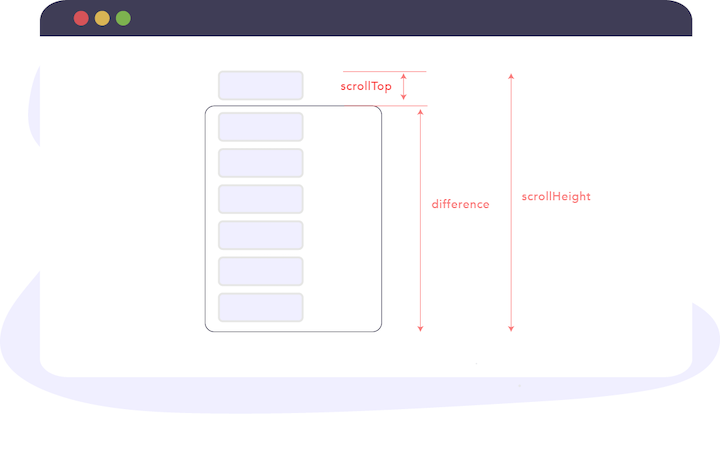
The computation fromcomponentDidUpdate will set toscrollTop value to the sum of the heights of extra messages, which is exactly what we want.
If you got stuck, I'm sure going through the explanation (one more time) or checking the source code will help clarify your questions. You can also use the comments section to ask me.
Unmounting lifecycle method
The following method is invoked during the component unmounting phase:
componentWillUnmount()
ThecomponentWillUnmount lifecycle method is invoked immediately before a component is unmounted and destroyed. This is the ideal place to perform any necessary cleanup such as clearing up timers, cancelling network requests, or cleaning up any subscriptions that were created incomponentDidMount() as shown below:
// e.g add event listener componentDidMount() { el.addEventListener() } // e.g remove event listener componentWillUnmount() { el.removeEventListener() } Error handling lifecycle methods
When things go bad in your code, errors are thrown. The following methods are invoked when an error is thrown by a descendant component (i.e., a component below them).
Let's implement a simple component to catch errors in the demo app. For this, we'll create a new component calledErrorBoundary.
Here's the most basic implementation:
import React, { Component } from 'react'; class ErrorBoundary extends Component { state = {}; render() { return null; } } export default ErrorBoundary; static getDerivedStateFromError()
Whenever an error is thrown in a descendant component, this method is called first, and the error thrown passed as an argument.
Whatever value is returned from this method is used to update the state of the component.
Let's update theErrorBoundary component to use this lifecycle method:
import React, { Component } from "react"; class ErrorBoundary extends Component { state = {}; static getDerivedStateFromError(error) { console.log(`Error log from getDerivedStateFromError: ${error}`); return { hasError: true }; } render() { return null; } } export default ErrorBoundary; Right now, whenever an error is thrown in a descendant component, the error will be logged to the console,console.error(error), and an object is returned from thegetDerivedStateFromError method. This will be used to update the state of theErrorBoundary component i.e with hasError: true.
componentDidCatch()
ThecomponentDidCatch method is also called after an error in a descendant component is thrown. Apart from theerror thrown, it is passed one more argument which represents more information about the error:
componentDidCatch(error, info) { logToExternalService(error, info) // this is allowed. //Where logToExternalService may make an API call. } In this method, you can send the error or info received to an external logging service. Unlike getDerivedStateFromError , the componentDidCatch allows for side-effects:
componentDidCatch(error, info) { logToExternalService(error, info) // this is allowed. //Where logToExternalService may make an API call. } Let's update theErrorBoundary component to use this lifecycle method:
import React, { Component } from "react"; class ErrorBoundary extends Component { state = { hasError: false }; static getDerivedStateFromError(error) { console.log(`Error log from getDerivedStateFromError: ${error}`); return { hasError: true }; } componentDidCatch(error, info) { console.log(`Error log from componentDidCatch: ${error}`); console.log(info); } render() { return null } } export default ErrorBoundary; Also, since theErrorBoundary can only catch errors from descendant components, we'll have the component render whatever is passed asChildren or render a default error UI if something went wrong:
... render() { if (this.state.hasError) { return <h1>Something went wrong.</h1>; } return this.props.children; } I have simulated a JavaScript error whenever you add a fifth chat message. Have a look at the error boundary at work:
Conclusion
It's been a long discourse on the subject of lifecycle methods in React , including the new additions with React 17. I hope this tutorial and the practical examples we walked through helped you gain a better understanding of what React lifecycle methods are and how they work.
Catch you later!
Full visibility into production React apps
Debugging React applications can be difficult, especially when users experience issues that are hard to reproduce. If you're interested in monitoring and tracking Redux state, automatically surfacing JavaScript errors, and tracking slow network requests and component load time, try LogRocket. 

LogRocket is like a DVR for web and mobile apps, recording literally everything that happens on your React app. Instead of guessing why problems happen, you can aggregate and report on what state your application was in when an issue occurred. LogRocket also monitors your app's performance, reporting with metrics like client CPU load, client memory usage, and more.
The LogRocket Redux middleware package adds an extra layer of visibility into your user sessions. LogRocket logs all actions and state from your Redux stores.
Modernize how you debug your React apps — start monitoring for free.
Source: https://blog.logrocket.com/react-lifecycle-methods-tutorial-examples/
0 Response to "Techsith Easy Way to Udnerstand React Lifecycle"
Post a Comment